
Friday, November 30, 2018
Turn 4 Orders Due Sunday December 2nd
It is the dawn of a new day (2nd Day) in the North Branch Campaign. Units were disengaged during the night, have received back routed units, and are now free to move or re-engage as per any restrictions in the Turn 3 reports. One corps has already submitted its Turn 4 orders. Where will the next engagements be? Your guess is as good as mine...
Thursday, November 29, 2018
Day One Highest Losses: No. 1
Just after giving the initial orders to commence operations in the North Branch Campaign, Army of the Mountains commander General Robert E. Lee became indisposed and left for Richmond. Lieutenant General Theolphilus Holmes (I Corps) assumed command of the army. Major General Sterling Price assumed command of the I Corps, and Brigadier General John Bowens took command of Price's Division. As the officers quickly moved into their new commands, Colonel James McCown (5th Missouri) assumed command of Bowen's Brigade, which was deployed at the cemetery just east of Sitesville.
At noon on day one of the campaign, Bowen's Brigade (McCown) was in the center of Price's Division, with McRae's and Fagan's Brigades to its left, Parsons' Brigade to its right, and Churchhill's Brigade in reserve to its rear. The left of Bowen's Brigade (6th Missouri) was at Valley Road, with the rest of the brigade in or near the cemetery and copse of cedar trees on the west side of the cemetery. Price's Division had skirmished earlier in the morning with 4th Division / VI Corps, which occupied Sitesville town at the junction of the Valley and Sitesville Roads. They were also aware of at least two other divisions belonging to the Union XII Corps that were deployed to their right front near Johnson's Meadow.

Because of woods and the nature of the terrain around Johnson's Creek, the Confederates were unable to detect two Union divisions to the west of Price: 4th Division, Cavalry Corps at Utt and 4th Division XII Corps. The Federals had not intentionally concealed these units, but they derived the benefit of the topography around their assigned positions. The cavalry division could be seen at the start of the midday phase of the 1st Day of Sitesville, as it galloped across a hill northwest of Vandegrif's Woods. The cavalry was moving around Price's Division (Bowen) to cut off its line of retreat to the west and south. Brigadier Bowen strengthened his position at the cemetery, other divisions also started movements that resulted in the near destruction of Price's Division.
Major General Martin Luther Smith's Division, which had been at the Potts Farm, was redeployed at McGee Hill to help secure that critical objective on the battlefield. As Smith moved away from Price's right flank, the two divisions of the XII Corps advanced on the cemetery in conjunction with the 4th Division, VI Corps moving east from Sitesville and assaulting Price's line. With Smith having vacated Potts, there was nothing to divert the left of the XII Corps away from its assault towards the cemetery.

The VI Corps struck Price's Division first, with 3rd Brigade, 4th Division (Brigadier General Joseph A. Mower) advancing along the north side of Valley Road and 1st Brigade, 4th Division (Brigadier General Hugh Ewing) advancing along the south side. As the VI Corps engaged the front of Bowen's Brigade (McCown), the XII Corps broke through Parson's Brigade to McCown's right. In hand to hand fighting, the right of Bowen's Missouri Brigade (McCown) was overwhelmed. The 2nd Missouri was captured by the 84th Indiana (3rd Brigade, 4th Division, XII Corps). The 5th Missouri was captured by the 23rd Pennsylvania (3rd Brigade, 4th Division VI Corps), and the 1st Missouri was captured by the 94th New York (3rd Brigade, 4th Division, XXI Corps) after close quarters fighting with the 17th Kentucky (3rd Brigade, 4th Division, VI Corps). Having been the meeting point of two assaulting divisions, entire right and front-center of Bowen's Brigade was captured.
On the left of Bowen's Brigade, the 6th Missouri fought Mower's 3rd Brigade, 4th Division, VI Corps before being routed by elements of 3rd Division, XII Corps that had arrived in support. Colonel McCown fell during the fighting, killed by the 6th Maine (3rd Brigade, 3rd Division, XII Corps). Only the 3rd Missouri remained on the field from Bowen's Brigade as the shattered division rallied at Sitesville Church to the east and then withdrew to a position at the Douglass Farm. Joined by the remnants of the 6th Missouri at night, Bowen's Brigade (2 regiments strong) will take the field under the command of Major James K. McDowell of the 3rd Missouri for day two of the campaign.
Bowen's Brigade, Price's Division, I Corps, Army of the Mountains (CSA)
(Brigadier General John Bowen, Colonel James McCown (KIA), Major James McDowell):
1st Missouri
2nd Missouri
3rd Missouri
5th Missouri
6th Missouri
Total Loss: 72.2%
Note: The collapse of Bowen's Brigade can be seen in the engagement video from about 18:30 - 21:15
At noon on day one of the campaign, Bowen's Brigade (McCown) was in the center of Price's Division, with McRae's and Fagan's Brigades to its left, Parsons' Brigade to its right, and Churchhill's Brigade in reserve to its rear. The left of Bowen's Brigade (6th Missouri) was at Valley Road, with the rest of the brigade in or near the cemetery and copse of cedar trees on the west side of the cemetery. Price's Division had skirmished earlier in the morning with 4th Division / VI Corps, which occupied Sitesville town at the junction of the Valley and Sitesville Roads. They were also aware of at least two other divisions belonging to the Union XII Corps that were deployed to their right front near Johnson's Meadow.
Because of woods and the nature of the terrain around Johnson's Creek, the Confederates were unable to detect two Union divisions to the west of Price: 4th Division, Cavalry Corps at Utt and 4th Division XII Corps. The Federals had not intentionally concealed these units, but they derived the benefit of the topography around their assigned positions. The cavalry division could be seen at the start of the midday phase of the 1st Day of Sitesville, as it galloped across a hill northwest of Vandegrif's Woods. The cavalry was moving around Price's Division (Bowen) to cut off its line of retreat to the west and south. Brigadier Bowen strengthened his position at the cemetery, other divisions also started movements that resulted in the near destruction of Price's Division.
Major General Martin Luther Smith's Division, which had been at the Potts Farm, was redeployed at McGee Hill to help secure that critical objective on the battlefield. As Smith moved away from Price's right flank, the two divisions of the XII Corps advanced on the cemetery in conjunction with the 4th Division, VI Corps moving east from Sitesville and assaulting Price's line. With Smith having vacated Potts, there was nothing to divert the left of the XII Corps away from its assault towards the cemetery.
The VI Corps struck Price's Division first, with 3rd Brigade, 4th Division (Brigadier General Joseph A. Mower) advancing along the north side of Valley Road and 1st Brigade, 4th Division (Brigadier General Hugh Ewing) advancing along the south side. As the VI Corps engaged the front of Bowen's Brigade (McCown), the XII Corps broke through Parson's Brigade to McCown's right. In hand to hand fighting, the right of Bowen's Missouri Brigade (McCown) was overwhelmed. The 2nd Missouri was captured by the 84th Indiana (3rd Brigade, 4th Division, XII Corps). The 5th Missouri was captured by the 23rd Pennsylvania (3rd Brigade, 4th Division VI Corps), and the 1st Missouri was captured by the 94th New York (3rd Brigade, 4th Division, XXI Corps) after close quarters fighting with the 17th Kentucky (3rd Brigade, 4th Division, VI Corps). Having been the meeting point of two assaulting divisions, entire right and front-center of Bowen's Brigade was captured.
On the left of Bowen's Brigade, the 6th Missouri fought Mower's 3rd Brigade, 4th Division, VI Corps before being routed by elements of 3rd Division, XII Corps that had arrived in support. Colonel McCown fell during the fighting, killed by the 6th Maine (3rd Brigade, 3rd Division, XII Corps). Only the 3rd Missouri remained on the field from Bowen's Brigade as the shattered division rallied at Sitesville Church to the east and then withdrew to a position at the Douglass Farm. Joined by the remnants of the 6th Missouri at night, Bowen's Brigade (2 regiments strong) will take the field under the command of Major James K. McDowell of the 3rd Missouri for day two of the campaign.
Bowen's Brigade, Price's Division, I Corps, Army of the Mountains (CSA)
(Brigadier General John Bowen, Colonel James McCown (KIA), Major James McDowell):
1st Missouri
2nd Missouri
3rd Missouri
5th Missouri
6th Missouri
Total Loss: 72.2%
Note: The collapse of Bowen's Brigade can be seen in the engagement video from about 18:30 - 21:15
Wednesday, November 28, 2018
Day One Highest Losses: No. 2
The collision of Colquitt's and Rosecrans' Division along Trout Run is now established in the history of the Battle of Sagarsville and the North Branch Campaign. 3rd Brigade, 4th Division, V Corps was one of the Union brigades involved in the action. Commanded by Brigadier General Frank Nickerson, the brigade was quickly entangled with all three of Colquitt's Confederate brigades around midday on the first day of the campaign.
Nickerson himself was killed by the 3rd South Carolina (from Pettigrew's Brigade) early in the fighting. The 103rd and 122nd New York were fighting near where Nickerson went down, taking heavy losses from Pettigrew's Brigade, while also engaging and routing the 1st North Carolina from Shoup's Brigade. The 103rd was eventually routed by the same regiment that had killed Nickerson, with the 122nd being routed as well.
The 123rd New York killed Brigadier General Pettigrew during the action and fought against units from Pettigrews, Shoup's and Armstrong's Brigades. It assisted in the rout of the 5th Louisiana (Armstrong), and 15th and 21st North Carolina (Shoup), before being routed and captured en masse by the 13th South Carolina. The 10th Ohio was also captured en masse.
By the time the two divisions began to disengage, the 3rd Brigade had only two regiments left: the 109th and 111 Pennsylvania. The 109th has been in the rear and escaped essentially unscathed. The 111th had taken some losses while engaging the 9th Louisiana and 1st Battalion Georgia Sharpshooters (Armstrong). Lieutenant Colonel Thomas M. Walker of the 111th commanded the brigade during the late afternoon and evening phase of the Battle of Sagarville, but Colonel William Heine, 103rd New York, will assume command for day two of the North Branch Campaign.
3rd Brigade, 4th Division, V Corps, Army of the South Branch (US) (Brigadier General Franklin Nickerson (KIA), Lieutenant Colonel Thomas Walker, Colonel William Heine):
103rd New York State Volunteers
122nd New York State Volunteers
123rd New York State Volunteers
10th Ohio Volunteer Infantry
109th Pennsylvania Volunteer Infantry
111th Pennsylvania Volunteer Infantry
Total Loss: 59.1%

Tuesday, November 27, 2018
Day One Highest Losses: No. 3
The Battle of Sagarville started in the morning phase of day one of the North Branch Campaign. Elements of the Union I Corps (Thomas) and V Corps (Hancock) advanced east from Newtown on Kingston Road towards Sagarville. The 1st Cavalry Division was leading the way. Their first obstacle in reaching Sagarville was a Confederate linebelonging to Lieutenant General James Longstreet's I Corps, Army of the Mountains deployed on a ridge to the east of the Piper Farm. Longstreet had posted Semmes' Brigade (Forney's Division) on the north side of Kingston Road and Baldwin's Brigade in a hedge line that ran across the top of the ridge south of the road. Another brigade was posted in Piper's Woods to the south of Baldwin.
Forney's line included the 15th Battalion Mississippi Sharpshooters, which opened fire on the advancing cavalry from a distance. The Confederate line was also supported by artillery to its rear and the cavalry was turned back before it could successfully engage the infantry deployed on the ridge.
As the cavalry was falling back, the 2nd Division, I Corps began to form between Trout Run and the Piper Farm for an assault on the Confederate line. The 1st Brigade (Colonel Newell Gleason) was the first to arrive and start forming. While waiting for the rest of the division to come up, the 36th Illinois was targeted by the Mississippi sharpshooters and took heavy loss without being able to return fire. Finally, the division started its advance, with the 1st Brigade straddling Kingston Road.
As the brigade ascended Piper Ridge, it engaged with Baldwin's Brigade to the right and Semmes' Brigade to the left. The 36th Illinois was on the right and took heavy losses from the 25th Tennessee (Baldwin) and was routed. The 87th Indiana lost over 180 men to Cobb's Georgia Legion (Semmes), before being routed by the 17th Tennessee firing on its rear from the other side of the road. Joined by a brigade of US Regulars from 2nd Division, V Corps on its left, the 150th Pennsylvania (Bucktails) and 8th Michigan continued the attack on Semmes' line, also taking heavy losses from Cobb's Georgia Legion. The 8th Michigan broke through along Kingston Road and routed Gun No. 4 of the Pulaski Georgia Battery that was supporting the infantry to its front. Forney's line collapsed and started a retreat towards Sagarville to the east.
During the midday phase of the battle, 1st Brigade (now only two regiments strong) was initially moved south from Piper and then east through the Lester Farm. The brigade advanced against a Confederate line on the northwest slopes of Bowlen Hill and engaged with William Walker's Brigade, Barksdale's Division. The 8th Michigan assisted in routing the 4th Mississippi and the 150th Pennsylvania routed the 39th Mississippi. The brigade then took part in the afternoon advance that entered the town of Sagarville, ending the battle and day one of the campaign. Despite being ain a position to rout an artillery crew at one point, very few of the brigade's losses during the day were to artillery fire. Sagarville was an infantry vs. infantry fight for 1st Brigade, 2nd Division, I Corps as it attacked enemy positions on ridges and hills.
1st Brigade, 2nd Division, I Corps (Colonel Newell Gleason):
36th Illinois Volunteer Infantry
87th Indiana Volunteer Infantry
150th Pennsylvania Volunteer Infantry
8th Michigan Volunteer Infantry
Day One Losses: 54.5%
 |
| Colonel Newell Gleason |
Day One Highest Losses: No. 4
The Confederates never intended to fight near Cosner's Gap on day one of the campaign. They had ordered three divisions (Pickett, Rodes, and Pender) to advance west on Clinton Pike into Franklin and Hutton Mills. This movement was blocked by the Union cavalry corps' 3rd Division under Major General David Birney. Birney advanced east on Clinton Pike and deployed his division between the Powell Farm and Cosner's Gap, allowing the Union VI Corps to arrive and deploy behind him.
The 1st Brigade of Birney's Division, under Brigadier General Samuel Sturgis, was assigned skirmish line duty to the division's front. As Sturgis' men were deploying, two Confederate divisions came down off of Durham Ridge, through the Village of Cosner's Gap, and began an attack on the Powell Farm. Pickett's Division was advancing north of the Clinton Pike, with Pender to the south of the Pike. Sturgis' cavalry was immediately engaged.
The left of Sturgis' line engaged Daniel's and Kershaw's Brigades from Pickett's Division. The 1st Massachusetts and 1st Pennsylvania Cavalry fought primarily with the 9th, 10th and 18th Alabama, trying to delay their advance as the VI Corps took position. Sturgis moved to bolster this part of his line and was killed by the 20th Alabama. Sometime during this fighting in the fields northeast of Powell, Confederate Brigadier General Joseph Kershaw as also killed. With Sturgis dead and Pickett's men pressing forward, the 1st Brigade's left collapsed and the 1st Massachusetts and 1st Pennsylvania were routed.
On the right of the line. the 8th Illinois Cavalry was fighting due east of the Powell buildings and engaged with the 41st and 44th Alabama. The Alabamans were part of J. K. Jackson's Brigade, which led Pender's assault. The right, particularly the 2nd Rhode Island, also took heavy fire from Pender's sharpshooters, which were deployed to the east in the orchards around the Village of Cosner's Gap. The two regiments gave way and the VI Corps continued the fighting around Powell.
Colonel William Gamble of the 8th Illinois assumed command of the brigade, prior to receiving orders to move to Mt. Zion Church with the rest of the division. The 3rd Cavalry Division was moving in the rear of the column as it passed through Marion and moved south on the Madison Pike. The 2nd Division began engaging the enemy (Colquitt's Division) at the cross roads near Mt. Zion Church without much success. Gamble's Brigade moved forward to support the left of the 2nd Cavalry Divison near the church, and lost 150 men in the fighting before darkness stopped the action.
1st Brigade, 3rd Division, Cavalry Corps (Brigadier General Samuel Sturgis (KIA), Colonel William Gamble):
1st Massachusetts Cavalry
1st Pennsylvania Cavalry
8th Illinois Cavalry
2nd Rhode Island Cavalry
Losses in Day One: 54.3%
 |
| Colonel William Gamble will command 1st Brigade at the start of the 2nd day of the North Branch Campaign. |
Monday, November 26, 2018
Day One Highest Losses: No. 5
As Forney's and Barksdale's Divisions were trying to hold onto Sagarville and fighting back a midday assault by the Army of the South Branch's I Corps and V Corps, Brigadier General Alfred Colquitt's Division arrived at Debussy on the Madison Pike from Mt. Zion Church. Colquitt was ordered to deploy south of Debussy and started moving south on a trail through the woods on the west bank of Trout Run.

At the same time, the 4th Division, V Corps (Major General William Rosecrans) had been ordered to extend the Union left. Rosecrans' Division had been resting near Colvin and had not taken part in the fighting during the morning. To move to the Union left, Rosecrans moved his division east on Kingston Road and then north on a path through the woods along the west bank of Trout Run. His intention was to move east again to support the left flank of Major General Abner Doubleday's 2nd Division V Corps, engaged near Finch's Woods. Rosecrans' men would never arrive on Doubleday's left, because they were on a collision course with Colquitt.
The two divisions literally ran into each other in the woods without time to deploy. The fighting became a jumbled mess, with minimal brigade cohesion. One of Colquitt's Brigades was Pettigrew's Brigade, commander by Brigadier General James Pettigrew. Pettigrew fell early in the fighting, killed by men from the 123rd New York (3rd Brigade, 4th Division, V Corps). The 123rd was in turn captured by the 13th South Carolina, one of Pettigrew's regiments. The 13th was then routed by the 107th Pennsylvania, 9th Ohio and 3rd New Jersey, representing three different brigades of their division.
Pettigrew's Brigade fought valiantly, with the 2nd South Caroline killing Brigade General Alfred E. Torbert and capturing the 13th New Jersey from the 4th (New Jersey) Brigade of Rosecrans' Division. The 2nd South Carolina was then routed by the 2nd New Jersey. By the end of the day, Pettigrew's Brigade had only one regiment left (14th South Carolina) whose commander (Colonel Abner Perrin) assumed command of the brigade. Despite heavy losses, the brigade is expected to return to the field on the morning of Day Two of the campaign.
Pettigrew's Brigade, Coquitt's Division, I Corps (Brigadier General James Pettigrew (KIA), Colonel Abner Perrin):
2nd South Carolina
3rd South Carolina
7th South Carolina
13th South Carolina
14th South Carolina
Day One Losses: 51%

Day One Highest Losses by Brigade: Nos. 6 - 10
Here is a count down of the 10 highest losses (loss as % of beginning strength) on day one of the campaign by brigade, starting with those ranked 6 - 10:

Sunday, November 25, 2018
Turn 4 Orders of Battle Out
Orders of Battle have been sent out to both armies for the start of Turn 4. I am still reviewing it and will be making corrections. If you see a mistake or have a question, let me know.
Next Orders Due: By Sunday December 2nd.
Next Orders Due: By Sunday December 2nd.
Still working on OOB
I am still working on the revised order of battle to reflect Turn 3 ending strengths and quality. I will be applying Rule 4.6.5 on unit quality adjustment. I will not be applying rule 4.6.7 on officer adjustments. I am just going to leave officers as they are for now due to time constraints.
One thing I have noticed is that, although the only corps to give up a locality, Longstreet's men at Sagarville fought very well.
One thing I have noticed is that, although the only corps to give up a locality, Longstreet's men at Sagarville fought very well.
Friday, November 23, 2018
Order of Battle Updates for Turn 4
I am still in the process of preparing the orders of battle for Day 2 of the Campaign. I have completed most of the work for 4 Corps so far. The rules for updates on brigade / division commander attributes and gun crew replacement are a little complicated, so it will take a little time to review those aspects of the oob once I get the unit quality reviews and updated strengths completed. The orders of battle should be ready this weekend.
Orders for the next turn are due by Sunday December 2nd.
Thursday, November 22, 2018

Wednesday, November 21, 2018
Intelligence Alert: Orders of Battle Released for Day 1 End
The orders of battle with information gathered from prisoners after the first day of campaigning is now available and are posted as pages available at the top of the blog. The Confederates have two divisions (Garnett and Hindman) on which the Union side has no details. As it turns out, the Federals have three division on which the enemy has no details: 4/I Corps, 2/XII Corps, and 4/Cavalry Corps.
The Confederates were erroneously informed that they had prisoners from 4/Cavalry in Turn 3. It turns out that no prisoners were taken from that division. The only casualties in 4/Cavalry were men wounded by shelling from enemy batteries on McGee Hill. The error does positively identify 4/Cavalry at Sitesville during Turn 3, but that could have been determined by process of of elimination anyway.
Again, the original force pools are also available as downloads on the introduction and rules pages.
Between Turns 3 and 4
We are between Day 1 and Day 2 of the Campaign. I have just sent out the Turn 3 reports (a little faster than I had expected). If you didn't get a report, see a mistake, or have questions, let me know.
I am starting to work on the orders of battle for intelligence purposes. They will be posted on the blog, with the basic orders of battle expanded to regimental and battery level for any division that had prisoners taken in Day 1. For those with a penchant for military intelligence, you can use the force pools (posted on the introduction page) to study the original strengths, qualities, and weapons of opposing units and get an idea of the strengths of weaknesses of various enemy divisions. These should be available in the next day or two.

I am starting to work on the orders of battle for intelligence purposes. They will be posted on the blog, with the basic orders of battle expanded to regimental and battery level for any division that had prisoners taken in Day 1. For those with a penchant for military intelligence, you can use the force pools (posted on the introduction page) to study the original strengths, qualities, and weapons of opposing units and get an idea of the strengths of weaknesses of various enemy divisions. These should be available in the next day or two.

Tuesday, November 20, 2018
Expect Turn 3 Reports Tomorrow
Turn 3 Reports should be out tomorrow morning. As a correction, it looks like each Army has 2 Divisions that have not had prisoners taken and have therefore not been positively identified by the enemy.
Working on Turn 3 Reports
I am working on Turn 3 Reports. I was surprised to find a couple of brigade commanders down that I hadn't initially noticed. When the reports come out, remember that they only reflect units that were present at engagements during Turn 3. Units that were routed in Turns 1, 2, and 3 will be returned to the order of battle for Turn 4, so some divisions could be larger at the beginning of Turn 4 than they were at the end of Turn 3.
I also determined that there are actually two divisions out of supply at the end of Turn 3: One Union Division 1/V at Garrettsville and one Confederate Division (Hood/V) at Keyser Ford. With the exception of one regiment, however, the Confederate Division is fully supplied at the start of Turn 4 anyway, so it will not make too much difference over the next 3 turns as along as the division can get back into supply by the end of Turn 6.
It looks like each side will have one division that has not been identified by the enemy yet. I believe all other divisions have made contact and had prisoners taken by the end of Turn 3.
Monday, November 19, 2018
Engagement Maps - Turn 3 End
Instead of issuing engagement maps, I am posting maps showing areas under control of each side at the end of Turn 3 where there is still an engagement. All units will be considered as disengaged for the night. Units may be redeployed anywhere within their zone prior to the start of Turn 4. Units may be given movement orders for Turn 4 as indicated (using roads to which they have access). On the map it says that they may exit via a given road and town. They may move as normal in Turn 4, moving beyond the adjacent town if desired and unimpeded by the enemy. (Infantry moves up to two towns per turn and cavalry up to three turns).
Sagarville is now completely in Federal control and they may move freely from any exit. Units that withdrew from Sagarville to Kingston are also free to move freely to the north, south or east, but may not return to westward to Sagarville in Turn 4.
If you have any questions, let me know.
Here are the maps:
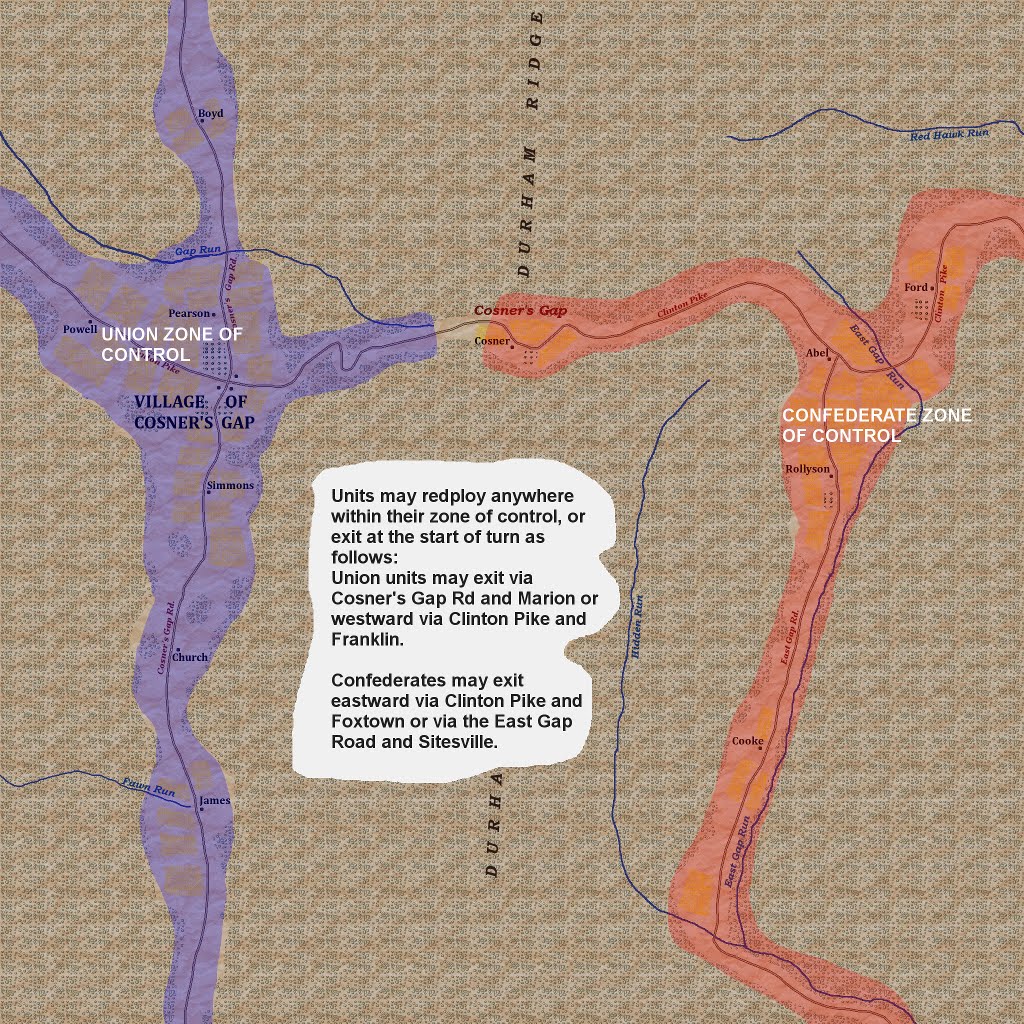
Sunday, November 18, 2018
Day One Engagements
In the end, there were engagements (in one case only long range shelling) in all of the "front line towns" during day one of the campaign. The Union Army of the South Branch has taken Sagarville, which is a significant victory in the center of the campaign theater. The Federals have also seized 2 out of 3 objectives at Sitesville, but the Confederates still hold onto McGee Hill there. Cosner's Gap remains firmly in Confederate hands, despite a light Union probe at the end of Turn 3.
In the southern section, Garrettsville has been a back and forth fight. Neither side has made much progress, but one Federal division is cut off from its supply line at the end of Turn 3. This is due to a Confederate presence at Keyser Ford, where there is some firing on the skirmish line across the West Fork at the ford.
What will Day 2 bring, as the Confederates try to hold or slow the Union advance? Casualties are mounting on both sides (no official figures yet) and Arlington still a long way away. If the Confederate Army of the Mountains can keep the Federals west of the North Branch River for two more days (6 Turns), they could achieve an early victory. Regardless of who wins, it has been an interesting campaign so far. More information will be available to the players on the status of their corps over the next week.

Status Update - Turns 3 and Turn 4
It has been a busy week and weekend for me, and I haven't been able to finish the turn yet. I expect to have the Sitesville video out tomorrow (Monday) and then starting working on Engagement Maps and Reports. I expect to have Turn 3 reports out by Wednesday. After that, I will work on the following:
- Intelligence: Publish the OOBs of Divisions that were engaged and had prisoners taken during the first day of the campaign (Turns 1 - 3).
- Unit Quality: Upgrade unit quality for units that are eligible based on their cumulative grades.
- Order of Battle: I will update the order of battle (strengths, qualities, brigade and division commanders) for Day 2 of the campaign (Turns 4 - 6) and send each army its order of battle)
- Turn 4 Orders: Because I am working on the above items, Turn 4 orders will be due on December 2, 2018.
Sitesville will be the last engagement of this turn, so there are no other surprises.
Still working on it...
Federal Probe into Cosner's Gap - Turn 3
Federals probe eastward along the Clinton Pike to the Cosner Farm at Cosner's Gap.
Saturday, November 17, 2018
Turn 3 in the Southern Sector: Garrettsville and Keyser Ford
Garrettsville, Turn 3
Garrettsville may go down in sim history as the engagement in which most of the divisions failed to achieve most of their objectives most of the time.
Keyser Ford
The skirmish no one was expecting in Turn 3.
Garrettsville may go down in sim history as the engagement in which most of the divisions failed to achieve most of their objectives most of the time.
Keyser Ford
The skirmish no one was expecting in Turn 3.
Friday, November 16, 2018
Tuesday, November 13, 2018
All Orders Received for Turn 3
All orders have been received for Turn 3. I am still seeing how they fit together and I am not sure how any fighting will turn out, but it looks like we are going to have some changes and surprises on the way.


Monday, November 12, 2018
Awaiting Orders...
About half of the Turn 3 orders are in. We expect the rest in today or tomorrow. Then I will start putting together the Engagement Scenarios based on the orders and we will see how the 1st Day of the Campaign ends up.


Sunday, November 11, 2018
Rule Amendment Later in Simulation
There have also been heavy losses among some brigades and divisions in the first two turns of the simulation. This includes entire regiments that have been captured en masse and removed from the order of battle for the rest of the campaign.
Rule 2.5 states:

Rule 2.5 states:
"The North Branch Campaign
represents a 3 to 5-day campaign. The armies will not receive additional units
or men during that time. Players will also not be able to make changes in their
orders of battle or consolidate units once the simulation starts, with the
exception of assigning any unassigned officers and units."
Players can expect an amendment to this rule in the future to allow re-organization within divisions after Day Two of the campaign (between Turn 6 and Turn 7).

Saturday, November 10, 2018
The Challenge of Turn 3
During Turn 3, both armies will be at a weak point. Regiments and guns have been routed. Many of the men are tired or exhausted. Some units have low morale. Many brigades have lost their cohesion. A few units (not many) are low on ammunition.
In Turn 4, units routed in Turns 1, 2 and 3 will have rejoined their commands, morale will be recovered and, unless something drastic happens, all units can expect a resupply of ammunition. Turn 4 will be a a very different military situation from Turn 3. In the mean time, how hard will the Federals push and how well can the Confederates hang on? The situation varies from division to division in each army. There are still some fresh, or nearly fresh divisions out there on both sides.

In Turn 4, units routed in Turns 1, 2 and 3 will have rejoined their commands, morale will be recovered and, unless something drastic happens, all units can expect a resupply of ammunition. Turn 4 will be a a very different military situation from Turn 3. In the mean time, how hard will the Federals push and how well can the Confederates hang on? The situation varies from division to division in each army. There are still some fresh, or nearly fresh divisions out there on both sides.

Friday, November 9, 2018

Thursday, November 8, 2018
Driven Back Along the Kingston Road
All the Federal attack was successful along some parts of the Confederate line at Sagarville in Turn 2, a brigade advancing along the Kingston Road was successfully repulsed just west of town.
 |
| Federal Dead on Kingston Road - Turn 2 End |
Colquitt Down

Wednesday, November 7, 2018
Turn 2 Reports Are Out...
All reports for Turn 2 are out. If you see anything that you think might be a mistake or something is missing, let me know.
 |
| Celebrating the Completion of Turn 2 Reports |
The Vortex of Hell - Sagarville Turn 2
Eight Brigadier Generals went down at or near this spot in a very short period of time during the Turn 2 action at Sagarville.

Captured Regiments
The Turn 2 fighting was at close quarters in some cases, with commanders going down, artillery pieces changing hands multiple times, and entire regiments getting captured with their colors. Each side will find some regiments captured during the Turn 2 fighting. If a regiment is captured, it will not be returned again to the OOB during this simulation. White flags went up at both Sitesville and Sagarville in Turn 2.

Regiments and artillery crews that were routed in Turns 1 - 3 will be returned for the start of Turn 4. Some divisions are becoming very diminished in numbers by the end of the first day of fighting.

Tuesday, November 6, 2018
Working on Reports - Turn 2....
I have been working on reports and have a few done. I have a work assignment tonight, so I will not be able to finish them. I expect to have the reports and maps out to everyone tomorrow (Wednesday) evening. One of the challenges is on whether or not to award a captured gun. It takes some digging around in the OOB screens to determine who captured it and how. Some guns appear as routed on the battery's OOB screen, but appear as captured on the gun's OOB screen and the OOB screen of the regiment that captured it. Those guns are awarded to the captors. Other guns show as captured, but were really routed and then ran across the field to be "captured" by a unit that did not engage the battery. These will not be awarded as captured pieces. Also, I have to determine which guns (and type of guns) that have been captured are still in possession of the captors at the end of the turn. Those routed after capture will be removed from the original battery's OOB, but will not be awarded to the capturing army's OOB in the next turn. Still working on it...


Monday, November 5, 2018
Working on Report Maps...
I am working on the maps for the Turn 2 reports tonight and expect to start the Corps Reports tomorrow. Remember: Just because you don't see an enemy unit does not mean it is not there. Some units could be obscured by terrain features. Valleys, hills and mountains conceal the enemy in or behind them well. No enemy units, for example, are visible at Cosner's Gap at the end of Turn 2, but all units that were visible at the beginning of the turn are still there at the end.
There was also a Union cavalry division at Utt (Sitesville) and an infantry division nearby in the woods behind another division at the end of Turn 1. I don't believe the players intended to have these units concealed, but due to the valley formed by Johnson's Creek, they were not visible to the enemy. I didn't even realize this until I was making the maps. I had to test it by running the scenario as Confederates and seeing whether the units were visible. They were not (even from McGee Hill), which surprised me, but that's the way it was.
I still hope to have reports out Wednesday night my time.
Losses Mounting in Day 1 of the Campaign
Turn 2 was the midday phase of Day 1 of the North Branch Campaign. There were over 15,000 losses in total between Sitesville and Sagarville. Day 1 will end after Turn 3. Routed units will be returned to their commands before the start of Turn 4 (morning phase of Day 2 of the campaign). Captured units will not be returned.
 |
| A Confederate line facing north at Sagarville |
Union Assault at Sagarville
Union troops attack a re-positioned Confederate line at Sagarville, with a surprise along Trout Run.
The dead around the cemetery
At Sitesville, there are over 6,000 total casualties during Turn 2. The vast majority of these are in the immediate area around the Sitesville Cemetery to the east of town.

Division Commander Down
When Turn 2 reports finally go out, one player will receive news of a division commander killed in action. This is the first division commander to be lost during the campaign. All of the brigade commanders in that division were also casualties.


Sunday, November 4, 2018
No Sagarville Video Tonight
I have been working on Sagarville, but it is not ready to run yet. Both sides have given movement orders to units that are engaged (sometimes within 30 - 50 yards from the enemy). This is extremely difficult to script, even when a retreat is issued. Units often end up staying engaged and pulling the rest of their brigades and divisions in. I hope to have the video out tomorrow night.
Turn 2 Reports will be late...
Turn 2 is moving along slowly. There will be four engagements:
- Cosner's Gap
- Sitesville
- Sagarville
- Garrettsville
I was busy during the evenings during the week, so I didn't get started until Friday night. I am working on the turn at Sagarville and hope to have it completed by tonight, possibly with the video posted tomorrow morning. Reports will not be out until Monday, Tuesday or Wednesday.
Saturday, November 3, 2018
Light Losses at Cosner's Gap - Turn 2
The total losses (both sides) at Cosner's Gap were less than 800 in Turn 2. No brigade or division officers fell during the fighting. The opposing sides no long have visual contact with each other.

Changing Situation at Cosner's Gap
Subscribe to:
Posts (Atom)