Saturday, November 30, 2019

Starbuck Offers Terms to Lewis: Night of August 20th, 1861

A courier has passed through the lines on Clinton Pike between the Headquarters of Major General E. J. Starbuck at Shingleton and that of Brigadier General Solomon Lewis at Carothers. The correspondence (unedited) appears below. The response from the Federal officer is not yet known.


                                                                                                                                 20 August, 1861
To: Brigadier General Solomon Lewis, U.S.,
Commanding Union Forces at Carothers
Sir,
            You and your men have fought gallantly over the past two days, and I commend you for it. As soldiers, you have more than won my respect. However, you now have your backs to the wall. I have a substantial force deployed at Lebanon – if you are beaten at Carothers, you will have no line of retreat. That being the case, and in order to avoid further effusion of blood, I offer you the following terms of surrender:

1: Your men will turn over to me all of your small arms, artillery pieces, ammunition of all kinds, and all other supplies and implements of war in your possession. You and your officers will be allowed to retain your swords and sidearms, and your men will be allowed to retain their personal possessions. Your rations will not be confiscated, and your regiments will be allowed to retain their colours.

2: Having fulfilled the above conditions, you and your troops will be allowed to march – entirely unmolested, I give you my solemn word – back into Union lines via Lebanon, Bonnett, Orr Tavern, and Riverside.

If you do not agree to these terms, combat will ensue at Carothers on 21 August.

I am, sir, very respectfully yours,
-Maj. Gen’l. E. J. Starbuck, C.S.,
Com’ding. Department of Tennessee

Union Withdraws from Shingleton: August 20, 1861

Confederate forces have taken the Shingleton Farm on the Clinton Pike, but at a heavy cost. The Union line under Brigadier General Solomon Lewis was unflinching under assault by a larger Confederate force. Only Captain Loomis' left section ("A," 1st Michigan Light Artillery) withdrew to a new position after expending its canister.  The Confederate attack wavered and broke in multiple places, but the regiments reformed and renewed the attack again. In general. the Louisiana Brigade under Brigadier Richard Taylor performed better than the Arkansas Brigade under Brigade General John G. Walker. Lewis' force, however, showed one of the best performances of the campaign before withdrawing in good order to Carothers.

Some selected footage from the Union position showing the action at Shingleton.

And the fighting was heavy.... Shingleton - August 20th


DYOD_Shingleton Ready

Action is expected at Shingleton on August 20th.  The map is now ready:

Shingleton: Looking Southeast from the fields near Iron Creek. 

Shingleton: Looking east along Clinton Pike

Looking west towards the Shingleton Farm. 

Aerial view looking west

Friday, November 29, 2019

Shingleton - August 20th?

There will likely be an engagement at Shingleton on August 20th, but..... I need to make the map first. I also need to make the map for Carothers, which could potentially be the location of an action on the 21st.

Engagement at Clinton - August 19, 1861

News from Clinton....

Wednesday, November 27, 2019

Up Next.... Clinton, August 19th 1861

There will be an engagement at Clinton on August 19, 1861. It will be one of the bigger engagements so far in the campaign in terms of troop strength.  But... it will most likely happen on Friday night or over the weekend.

Happy Thanksgiving to those of us in the US!

Confederates Re-Take Centerville! - August 19 - 1861

After an extended fight between two regiments of Cleburne's Brigade (1st and 2nd Alabama) and the 1st Illinois Infantry, the Federals were finally driven out of Centerville and forced back north to Caesar Ford on the Bull Head River. The 1st Alabama broke and fled east to East Troy. Centerville is held by the 2nd Alabama.

The 1st Illinois' last position. 

As the 1st Illinois fell back slightly, the 2nd Alabama moved through an orchard from its west to east end and opened fire again.

The final retreat of the day: To Caesar Ford. 

Stunning Development at Centerville (engagement still in progress)

The 1st Illinois advanced west on Munson Hill Road towards Centerville town. As soon as it was visible to Cleburne's Brigade, the Alabamans advanced out to engage them. The 1st halted and deployed at a house on the northeast corner of the town, where it is entered by Munson Hill Road. The 1st Alabama stopped and engaged from a wheat field to the southeast of the 1st Illinois, as the 2nd Alabama moved through some woods to the rear of the 1st on its way to take position on the right of Cleburne's line.


The 2nd took a long time coming into line. As the 1st Alabama continued to take fire, it suddenly broke and fled to the east and left the field. The 2nd Alabama came into position in an orchard just east of the 1st Illinois to find it is the sole Confederate regiment left on the field. (The 1st will reform at East Troy on the 20th.)


The fight continues. Neither side has hit its breaking point, but the action is not a very close contest.

Centerville Still Being Contested - August 19th

The action at Centerville is still contested after 1 hour in-game (all under AI).

The belligerents:

US:


CS: Cleburne's Brigade (Brigadier General Patrick Cleburne is on the field)

  • 1st Alabama (Colonel Marcellus Douglas) is advancing from Nicholas, having been driven out of Centerville by the 1st Illinois and a battalion of cavalry on August 9th. 
  • 2nd Alabama Infantry (Colonel Dixon Barnes) is arriving from LeMasters. The 2nd Alabama's main action in the campaign has been defending against cavalry probes in Arlington. 
Summary of Part I of Centerville - August 19

The 2nd Alabama opens up the engagement on the Kingston Road. 

The 1st Alabama arrives on the Centerville Pike. 

Initial fighting in town. 

1st Alabama fires into the 1st Illinois' left flank. 

The 1st Illinois starts to waver just before retreating to a new position. 

The 1st Illinois starts to reform in a small patch of woods northwest of town. 

The 1st Alabama attacks the 1st Illinois in its position in the woods before the 2nd Alabama comes up into line. 

The 1st Illinois fires across the Munson Hill Road at the 2nd Alabama from its second fallback position west of the Methodist Church. The 1st Alabama is advancing through the woods on the 2nd Alabama's left. 

The 1st Illinois retreats in good order from its position near Munson Hill Road. 

The Federals reforming in a field east of Becker and Crew.

The 1st and 2nd Alabama form in the field, advance together and attack the 1st Illinois, which wavers and then falls back deep into a large patch of woods NE of Crew. 

Having lost contact with the enemy, Cleburne directs his men back to the south. 

The 1st Illinois starts to rally in the woods well to the north of the Confederates. 

Cleburne and his men return to the center of town. 

Once morale was significantly restored, the 1st Illinois advanced south across the field to its previous fallback position in a small patch of woods on the north side of Munson Hill Road. 

Resting in the woods, the 1st Illinois is almost ready to continue contesting Centerville. 


Neither side has routed or reached its casualty threshold. The total casualties are about equal. At the 1 hour mark, the 1st Illinois is rested and its morale is back to "good." I will wait to see if it returns to Centerville when morale reaches "excellent." If not, I will put them marching back to Centerville and turn it back over to AI for another round. So far, the only scripting was the 1st Illinois on hold in their original position in town and the 1st and 2nd AL marching into town with the brigade set on attack. Everything else has been under AI so far. Let's see what happens from here....

Coming Up... A Fight to the Finish at Centerville on August 19th, 1861

Both sides appear to have attached a lot of importance to Centerville. A Confederate force is preparing to attack it with a "take at all costs" order with an extremely high casualty threshold. At the same time, the Union occupying force has a "hold at all costs" order. Something's got to give and someone's going to get routed from the field. (I haven't run the scenario yet, so I am not sure who.) 

Confederates Take Newport - August 19, 1861

The 1st Mississippi Infantry advance north on the Old Stage Road towards Newport. It was met by the 2nd Kentucky Cavalry (US), which was in a defensive position at the Davis house to the southwest of Newport town. As the Confederates approached, the cavalry opened fire. Armed with poor quality Dresden muskets, the Confederates advanced at the double quick to get into position to return fire. As they drew close, one of the Union battalions charged into the much larger Confederate unit and was driven back. A second battalion prepared to charge into the enemy, but the Union commander called a retreat and the cavalry withdrew across the South Branch River to North Bank, leaving Newport in control of the Confederates.


Confederates Hold Lebanon - August 18, 1861

Union cavalry advancing from the northwest (Monroe and Jaynes) probed towards Lebanon. As they approached the village, the were met by a regiment of infantry supported by cavalry on its flanks. After a light engagement, the Federals withdrew back up the Clinton Pike toward Jaynes.
Union cavalry (3 battalions) advances on Lebanon.

Confederate infantry forms and opens fire on the Federals. 

Confederate cavalry moves up through Lebanon and forms on the right of the Confederate infantry. 

The cavalry on the Confederate right starts to put pressure on the Union left. 

The Federals retreat and then start a withdrawal to Jaynes. 

Union Takes Indian Rock Manor - August 17, 1861

Union forces advancing from Clinton and Twin Fords engaged the 3rd Kentucky Infantry (CSA) at Indian Rock Manor on August 17.
The 3rd Kentucky Infantry (CSA) opens fire on two Indiana regiments advancing from the north. A section of artillery deploys to the rear of the infantry. 

As one regiment held the 3rd Kentucky in place, the other moved at the double quick (as directed by AI, not script) around on the Confederate regiment's flank. No matter which Indiana regiment the 3rd Kentucky faced, the other was firing directly on its flank. 

As the Indiana Regiments inflicted heavy losses on the 3rd Kentucky, additional Union infantry came over the hill from Twin Fords. The Confederates broke before the newly arrived infantry could get into position to fire. 

The rout of the 3rd Kentucky represents the first actual rout of an infantry regiment during the campaign. It was in full retreat when it was hit by a shell from Union artillery, triggering the rout. The regiment will reform at Almshouse Ford on the 18th. The 3rd Kentucky routed in-game before they reached their casualty threshold for the engagement.

Tuesday, November 26, 2019

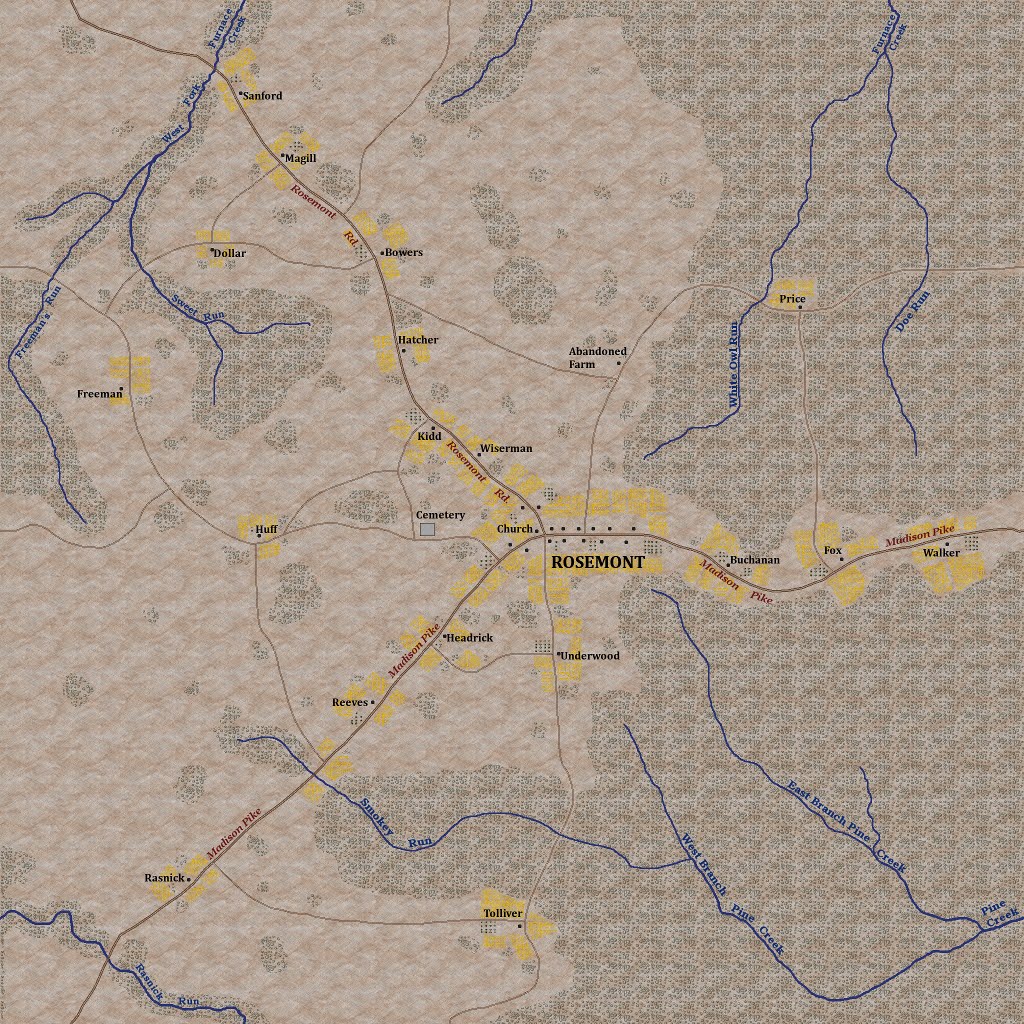
DYOD_Rosemont Released

The map for Rosemont is now available. I have finished plotting all of the initial movement for Turn 7, but was working on this map and wanted to get it done before I get into the first engagement. If all goes well, fighting should start tomorrow, but might take a while to play out. Player interventions will be need at several points.  In the meantime, here is a peak at Rosemont...


Units getting ready to move in Turn 7

Plotting the movements for Turn 7 was complicated. There were a number of intricate movements on both sides. I am giving them a 2nd look, but should start running the turn before Thanksgiving soon. At any rate, it appears that there will be an engagement at Indian Rock Manor on Day 1 of the turn (August 17th).

Sunday, November 24, 2019

All Turn 7 Orders are in

All orders for Turn 7 are in.  I will start plotting out the movement tomorrow night and can expect some action later this week. Reports will definitely be out by December 6. After that, we will take a break and Turn 8 will run in January.

Wednesday, November 20, 2019

Rule Changes Coming in Turn 7

A few rule changes that were planned for Turn 9 will take effect in Turn 7. In summary:

1. Resource Point Value Per Turn Change:

  • Bristol and Georgetown will be valued at 250 points per turn effective Turn 7
  • Ashland, Burlington, Fairview, Jackson, Madison and Springfield will be valued at 50 points per turn effective Turn 7
  • Centerville, Clinton, Marion and Newport remain the same at 10 points per turn. 


2. Casualty Thresholds for Minor Engagements:

  • Players may now give custom casualty thresholds per engagement in their orders effective Turn 7.


3. Cavalry Observation: 

  • Cavalry may be ordered to keep an enemy unit or location under observation. It will advance to just outside the enemy picket line each day, but not engage. It attempt to follow the enemy if the enemy moves and the cavalry with withdraw if advanced upon by infantry. It will only engage if advanced upon by other cavalry.  Observation will usually only determine presence. A probe (light engagement) is still needed to attempt to identify a unit or enemy strength. Effective Turn 7


4. Recruits to Existing Regiments: 

  • A limited number of newly recruited men may be assigned to existing regiments at the end of each month and present for duty on the 1st of the following month. Effective after Turn 8. 

These rule changes will increase the resources available and allow units to build their armies more quickly. They also give more options to influence the outcome of minor engagements. 

Tuesday, November 19, 2019

Brief Break

We are taking a brief break from the simulation and offer our condolences to Jake, the Confederate player, who just lost a close family member (his aunt) to cancer. We are so sorry for your loss.

Sunday, November 17, 2019

Turn 6 is Over!

Turn 6 of the Grand Campaign is over. Reports should be out sometime in the middle of this week.

Turn 7 will run with the dates of August 17th to August 23rd, 1861.

Federals Take Kingston! - August 16, 1861

This is one of those unexpected outcomes in a simulation. There were only two regiments involved in this engagement: the 3rd Tennessee Infantry (Colonel Vaughn) and the 3rd Indiana Infantry (Colonel Holzmann). The 3rd Tennessee had a much higher casualty threshold for the engagement, the terrain was flat, and there is no way to really flank the enemy without another friendly unit providing fire to the front of an opposing unit. I thought this would clearly end with the 3rd Indiana withdrawing back to Black Horse Tavern.

The scenario was set so that the 3rd Tennessee was deployed in the center of town, but set for "attack," because the army commander had ordered all units with smoothbore weapons to close ground when engaged.  The 3rd Indiana was scripted to moved down the Tavern Road to the center of Kingston, and was also set for "attack." I did not intervene at all during the scenario.

As the 3rd Indiana approached, the 3rd Tennessee advanced out of town to meet it. The 3rd Indiana then veered off the road to the west, as if trying to gain the 3rd Tennessee's flank. In response, the 3rd Tennessee moved east off the road. It was also like watching a boxing match, as they seemed to keep looking for a better position, starting to form, and then moving again. The 3rd Indiana stopped in an orchard and slowly wheeled, managing to open fire on the 3rd Tennessee while it was still also trying to wheel into position. I thought the 3rd Tennessee would complete its wheel and return fire. Instead, it formed column and marched back to the middle of town.

While the 3rd Tennessee was heading back to the center of town, it was still in range of the 3rd Indiana. But instead of continuing to fire, the 3rd Indiana also formed column again, followed them, and then charged. When the resulting melee broke, the 3rd Tennessee was in full retreat. I couldn't believe it, but that is how it went down...